
Building things is not my strong suit. Part of it is for a lack of experience and a lack of trying, because usually I don’t need to. I am married to someone who is a master at jerry-rigging unlikely implements into something useful, usually to the amazement of whoever is watching. Because he can undoubtedly do whatever I’m trying to do in that realm much better and more quickly than I can, I almost always leave those tasks up to my other half. Something that takes him 5 minutes can easily take me an hour, so in the name of efficiency, I usually take a step back and let Evan do the bulk of the work, helping as needed and trying to absorb as much information as I can as he’s explaining to me how to do whatever magic he is performing.
But for the past couple of months, Evan has been working long days 7 days a week trying to keep Organic Climbing/Nittany Mountain Works up and running and supplying the world with masks during this pandemic, so my personal carpenter/ electrician/ mechanic/ handyman/ jack-of-all-trades doesn’t have much free time. I, on the other hand, am at home all day, and I am hesitant to ask Evan to give up much of his evening to help me with projects around the house that I deem to hard to tackle myself just because I’ve convinced myself that I don’t know how.

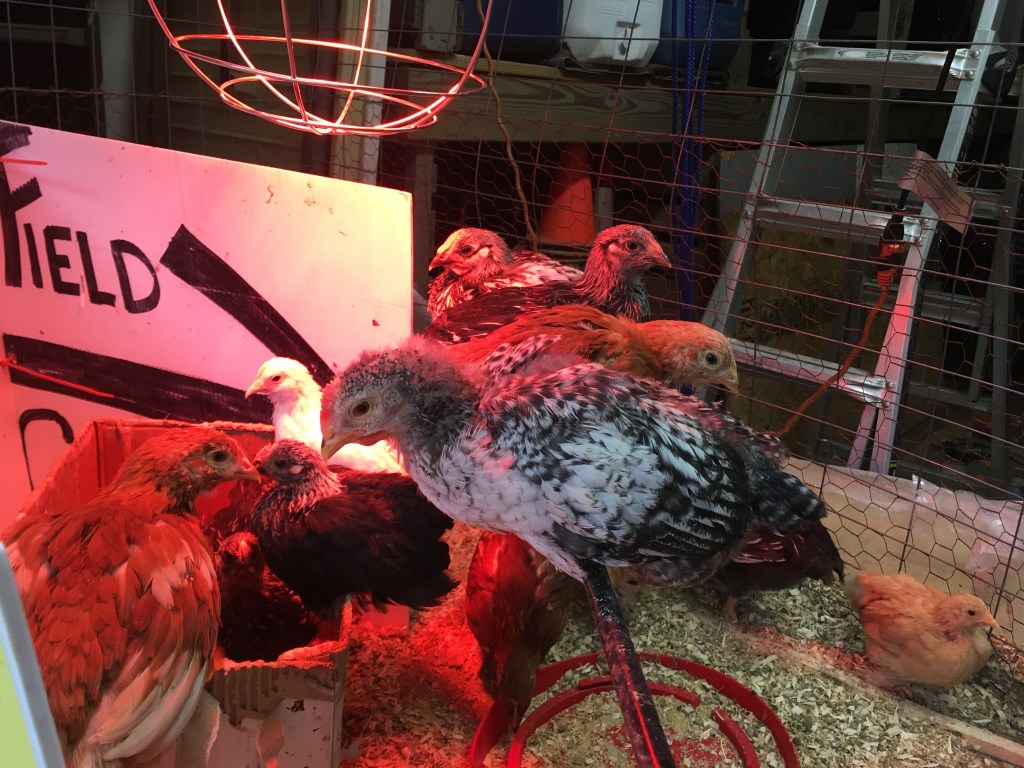
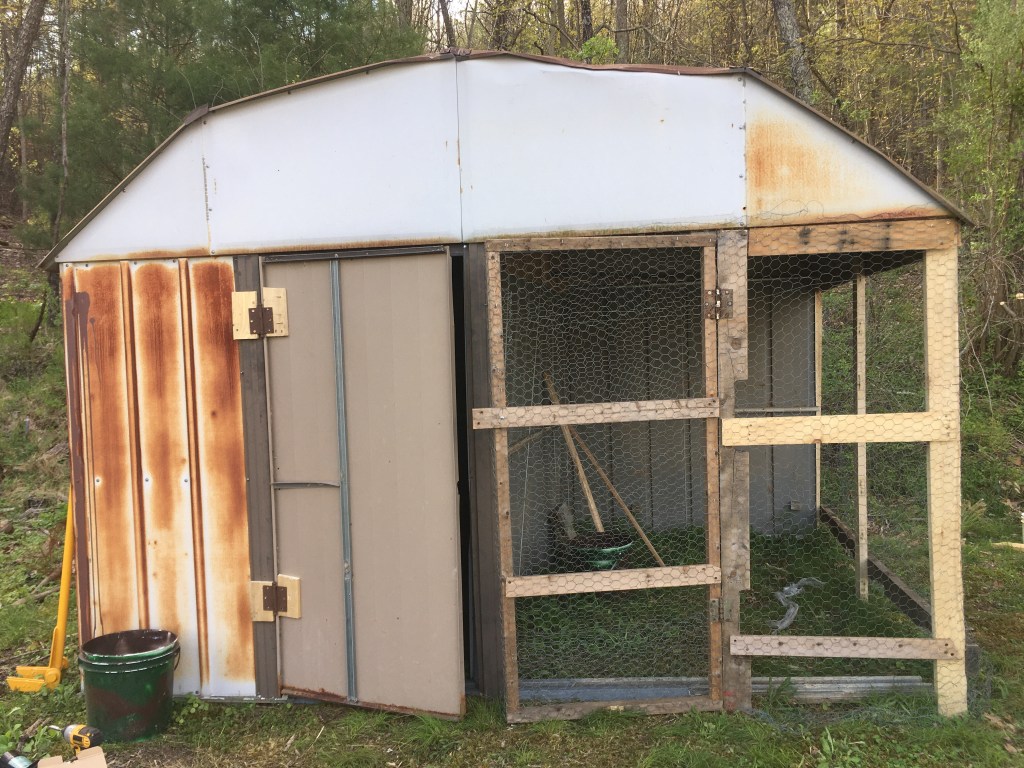
One of these projects was to build a chicken coop for the 15 rapidly-growing chicks that we picked up about two months ago. They lived in totes inside the house for the first couple weeks, and then we moved them into a larger cage in the garage. Evan planned to finish retrofitting the old metal shed that was falling down in our backyard into a new home for the flock, but as the weeks wore on and the free time he thought he might get never materialized, I started to grow antsy. The little fluffballs were growing real feathers and looking more and more like adult chickens by the day, and they were soon going to be too big to stay crammed into their garage home. It was time for me to put on my big girl pants and figure out how to build a chicken coop.


The task was made a bit more challenging by the fact that we were trying to do it as cheaply as possible, with materials that we had on hand, and retrofitting the old metal shed was probably much harder than just building a wooden structure from scratch. But we had the shed and unsuccessfully tried to get rid of it in the past, so we might as well use it for something. Evan brought me a few big pallets from work and taught me how to rip them apart to harvest the wood. He also shared a couple tips and tricks for securing wood to metal via scrawlings on scrap paper over dinner.

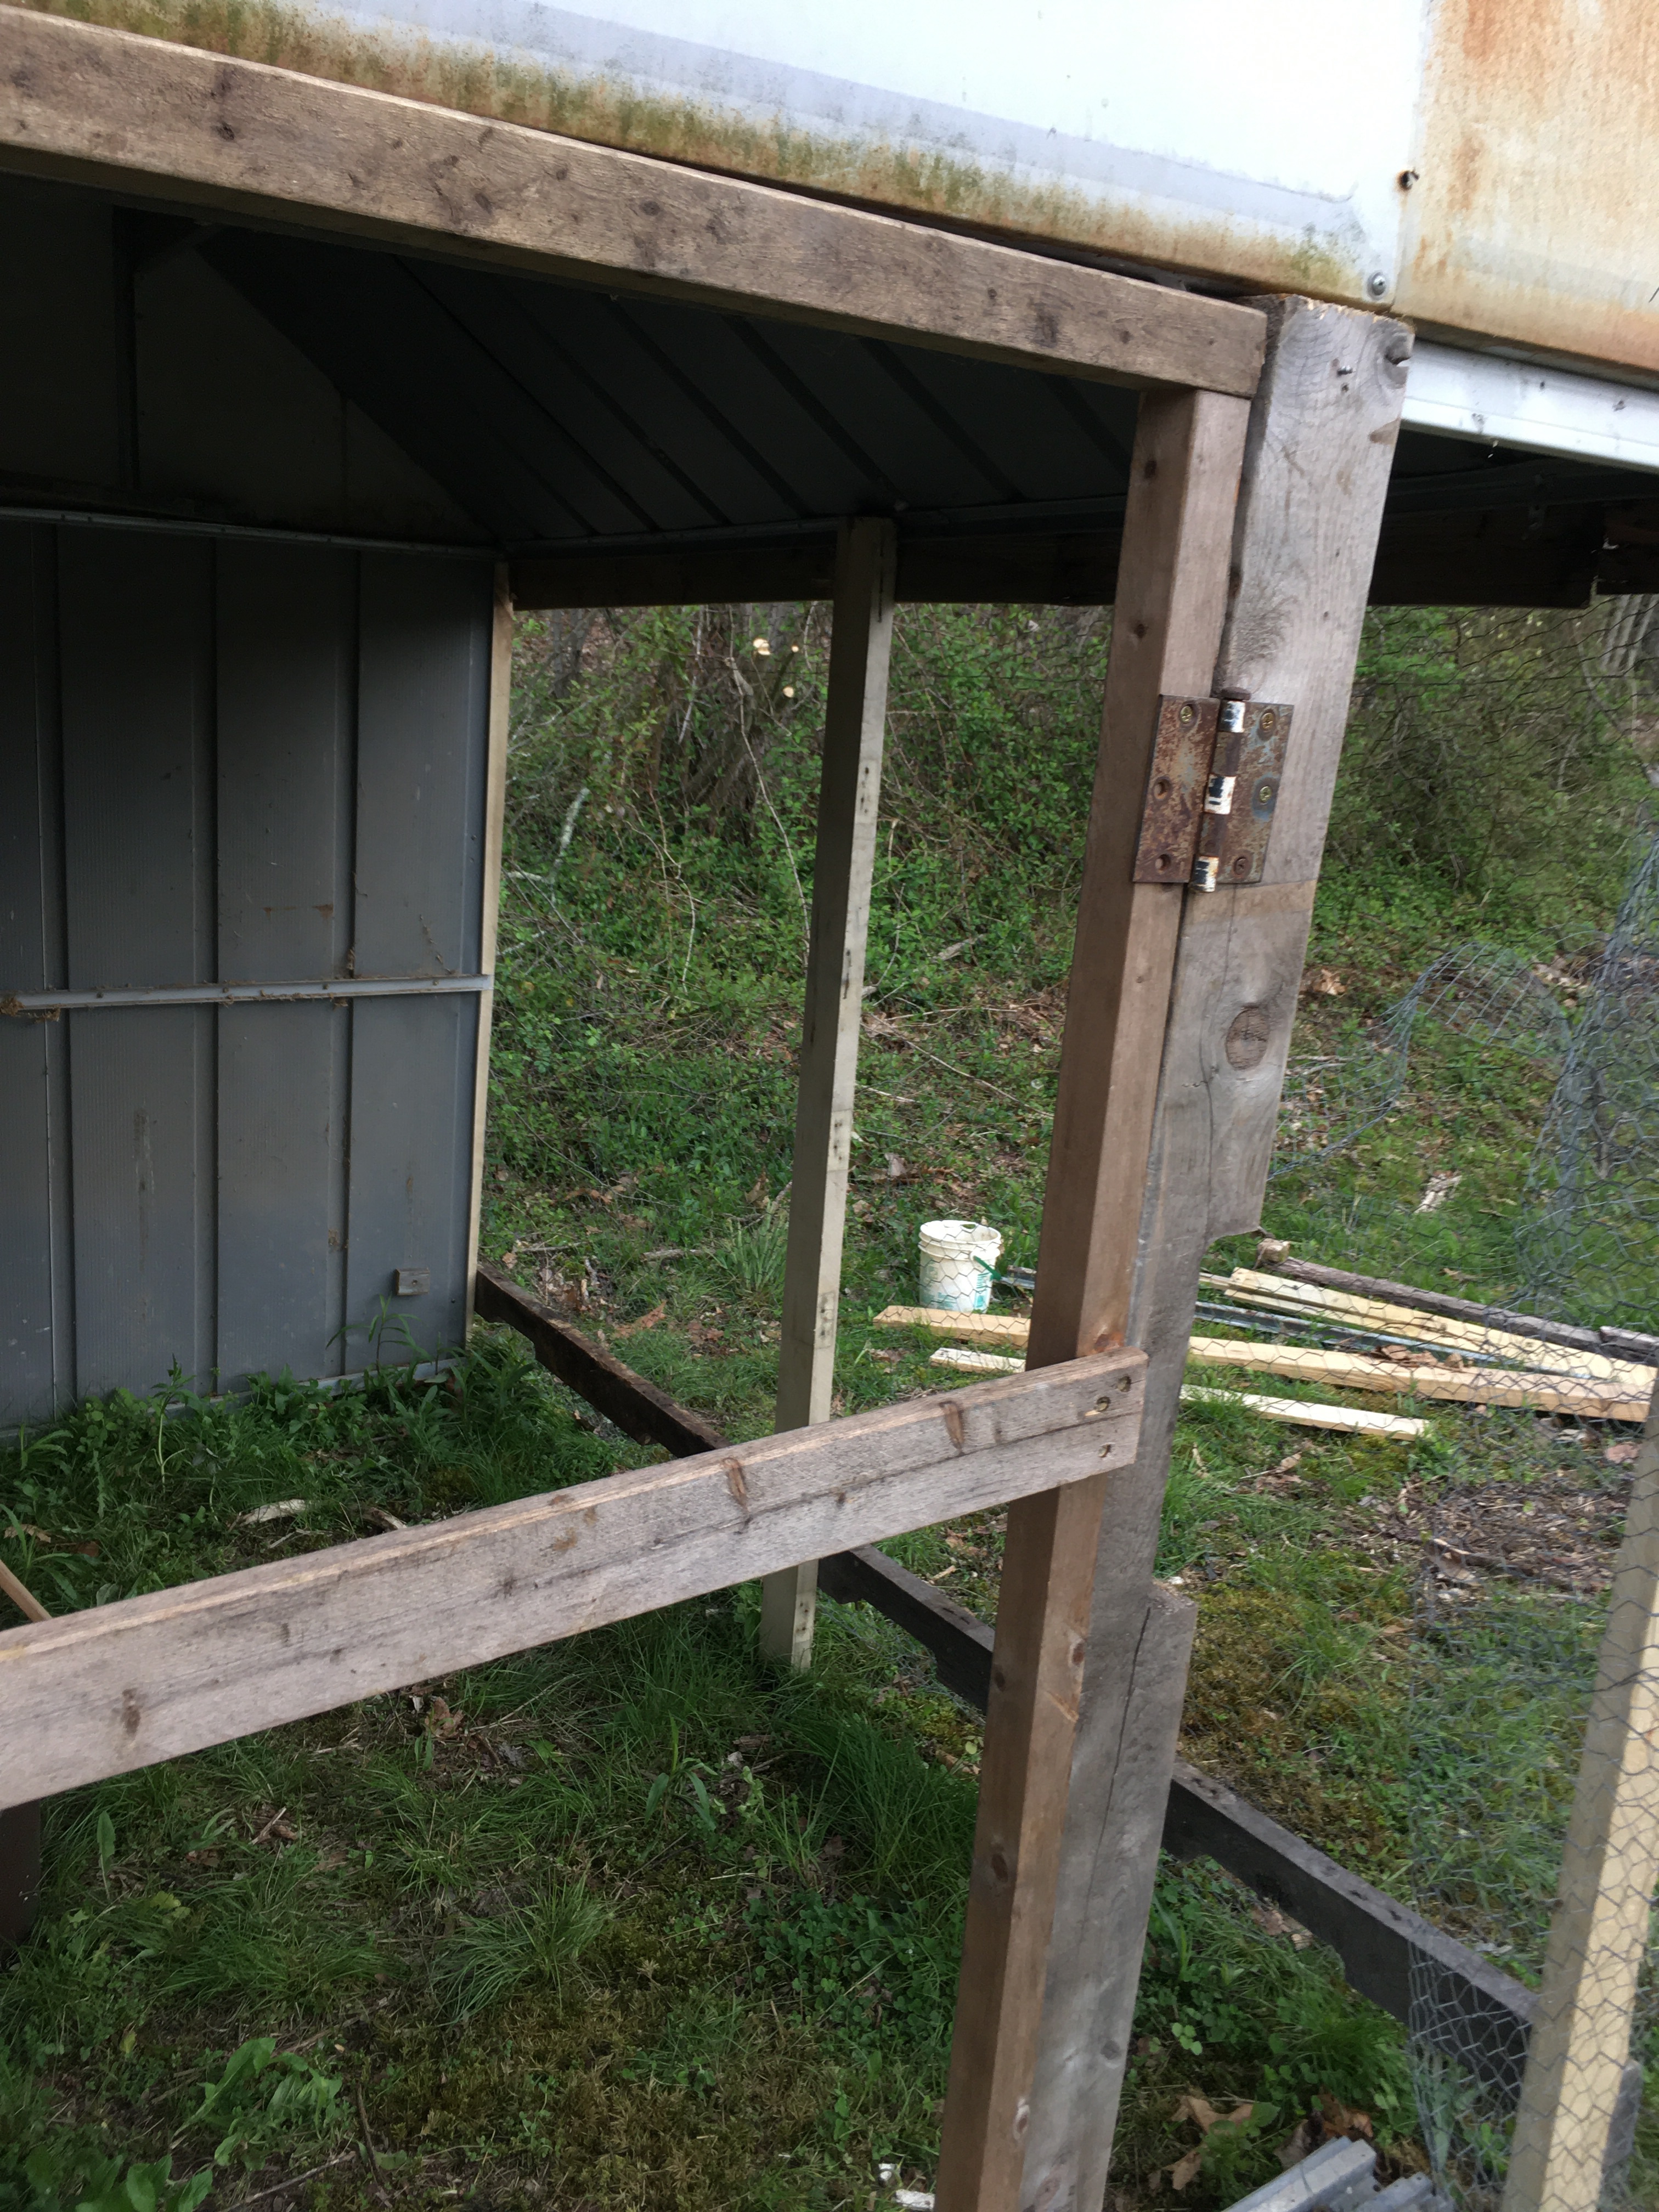
With nearly everything in life, getting started is the hardest part. I spent much time standing out in the yard, staring at the would-be coop, trying to come up with a plan. I drew my own schematic so that I’d remember the ideas I came up with. I began with one of the most simple parts — creating additional supports for the “outside” portion of the structure and a framework to which I could attach chicken wire.

I used the long edges of a big pallet for both the main supports and the cross-members, which helped to provide additional structure and a surface to which I could affix the chicken wire and hardware cloth. A small bucket came in handy to hold the cross-member boards about 8 inches off the ground while I screwed them in, my inanimate second set of hands.

Since the wood also needed to act as a surface to which I could staple the chicken wire, I also had to add wood in areas where I didn’t actually need it for support, such as along the roof line. For these areas, I used pallet wood decking, as they didn’t need to be as sturdy. The roof line already featured a piece of metal with holes in it that originally held the metal siding, so I just screwed the wood to that.


Once the framework was built, I attached chicken wire via staples and screws that were already holding the roof in place. The easy part was done — now it was time to move on to the more complicated problems.


The metal doors that used to slide really didn’t work anymore, and had been removed from their slides and were nearly impossible to get back in. I needed to figure out either how to use the existing door in a new fashion or find or build a different door. Then I realized I’d need two doors, because we would need a way to get into the outer area of the coop as well in order to shut the door for the chickens if it was going to be cold or to do repairs/cleanup in that area of the coop. I didn’t want to deal with two rickety, crooked metal doors, and I really liked the idea of the entire “outside” half of the coop being nice and open. So I decided to build a door from scratch for that side, and use the old metal door for the “inside” side.

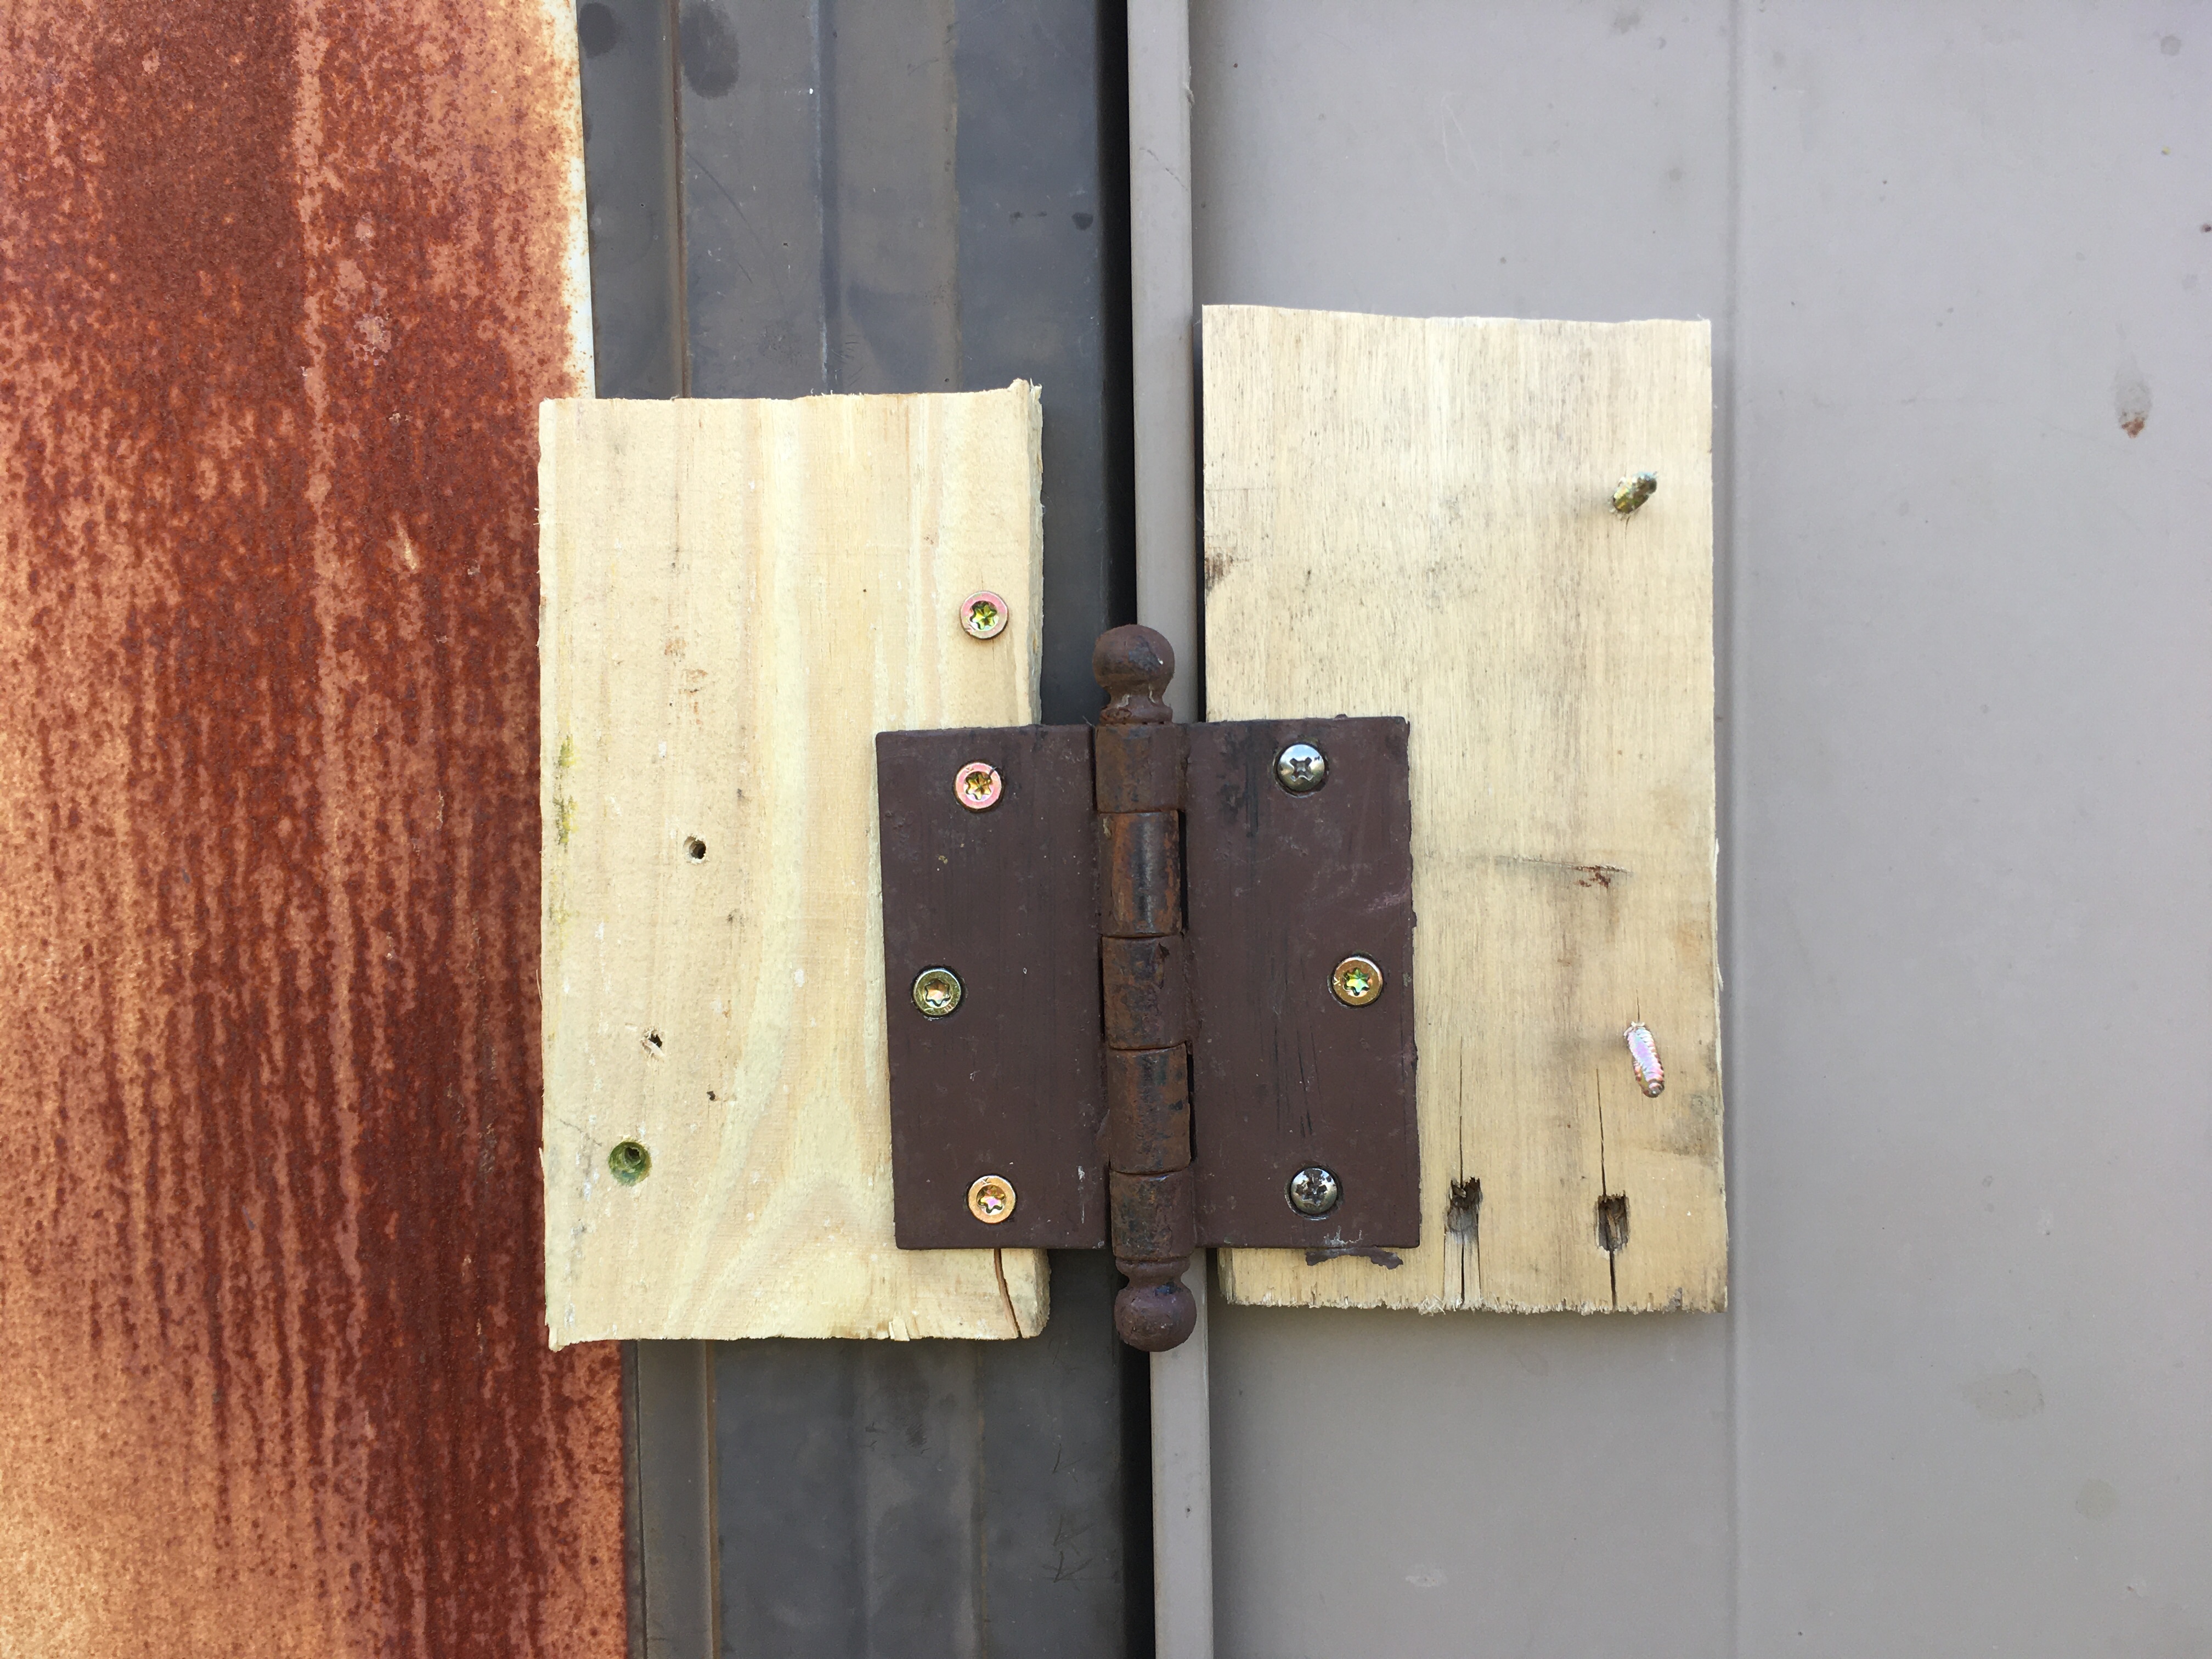
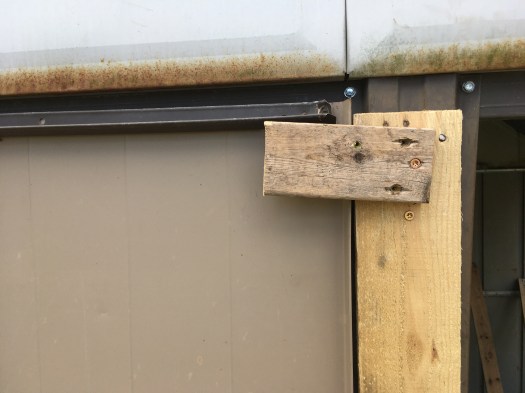
We had a big frame for a sign hanging around that was made of 1 1/2 inch square posts, which I deconstructed and chopped up to my desired size. That sounds so simple, but in reality, when I tried to fit the door into its location, I realized that the slight lean of the shed combined with a slight discrepancy in the lengths of each side of the door caused it to not sit flush. I made adjustments and tried again. Eventually I got it right, and mounted it with hinges harvested from an old, currently-unused gate.
I continued the chicken wire wrap across the door, deciding to just wrap continuously over the hinges rather than cutting it and wrapping the door separately. I started to cut the wire at the edge of the door where it meets the metal section of the shed, but halfway through I decided that it would be more secure and there would be less opportunity to get poked by the prickly ends of cut chicken wire if I continued the wrap around the door to the inside. This requiring re-mating the pieces of the chicken wire that I’d already cut, which isn’t very pretty but it works, a statement which pretty much sums up the entire coop.

Aside from a few small sizing snafus, building the wooden door wasn’t that hard, but I wasn’t sure about how mounting the metal door would go. I was stuck on that problem for a day or two before finally figuring out a solution using wooden blocks to create a platform to mount the hinges so that they would be flush. I used a similar strategy to mount a latch on the other side of the door. Because the door and shed were a bit “cattywampus” (technical term), I needed to use two latches — one at the bottom and one at the top — to keep the door sealed shut so that no predators could get in. I figured the more secure closure needed to go at the bottom as that’s where animals like raccoons, fishers and foxes would potentially try to enter, so I used another harvested piece of hardware from a gate for the lower lock. The upper section of the door just needed something simple to keep it closed, so I made my own rustic latch out of a couple pieces of wood (full disclosure: I watched a YouTube video on “DIY latches” for the idea). I used the same technique to make a latch for the door on the outside section of the coop as well.


I had begun work on the coop on Friday afternoon, basically getting the supports for the outer section done and that’s it. On Saturday, I tacked up the chicken wire and fiddled with some roosts and perches on the inside. Sunday was my marathon day, consisting of getting the doors situated and finishing the chicken wire wrapping. I worked on it for 12 hours — yes, 12 hours! — and was totally in the zone and loving it. I didn’t even go ride my bike like I’d planned because I was on such a roll. I was actually having fun trying to problem-solve, something that often would stress me out in the past if I didn’t know how to do something. It felt good to be so immersed, and I felt empowered every time I came up with a solution to a problem that I encountered. But it was a ton of trial and error. I’d do something one way and then decide halfway through, or even after it was almost finished, that it would be better a different way. I’m not sure there’s a single piece of this structure that I didn’t have to unscrew and change around after I started building.

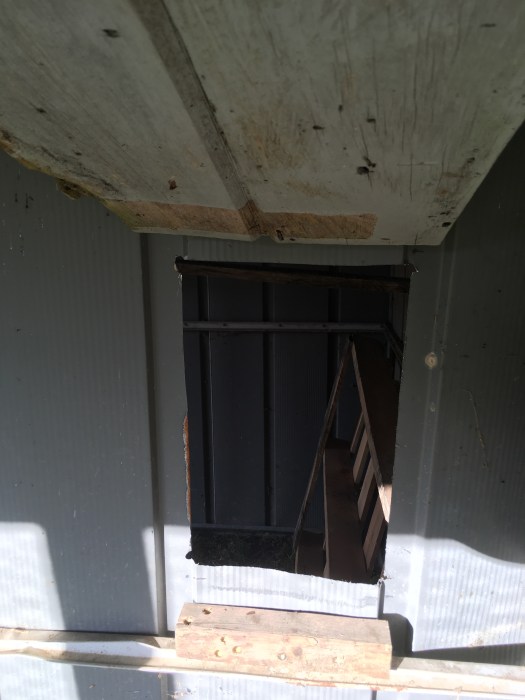
Once the doors were finished, the only thing I still needed to do before moving the chickens in was cut a hole in the inner wall so that they could go from the inside area to the outside area. This required using the jigsaw, a tool I’d never used before and slightly frightened me. But at 6:30 am on Monday morning, I was out there giving it a go, and discovered that actually the jigsaw was very easy to use and the task I had been putting off and dreaded for days actually took about 5 minutes.

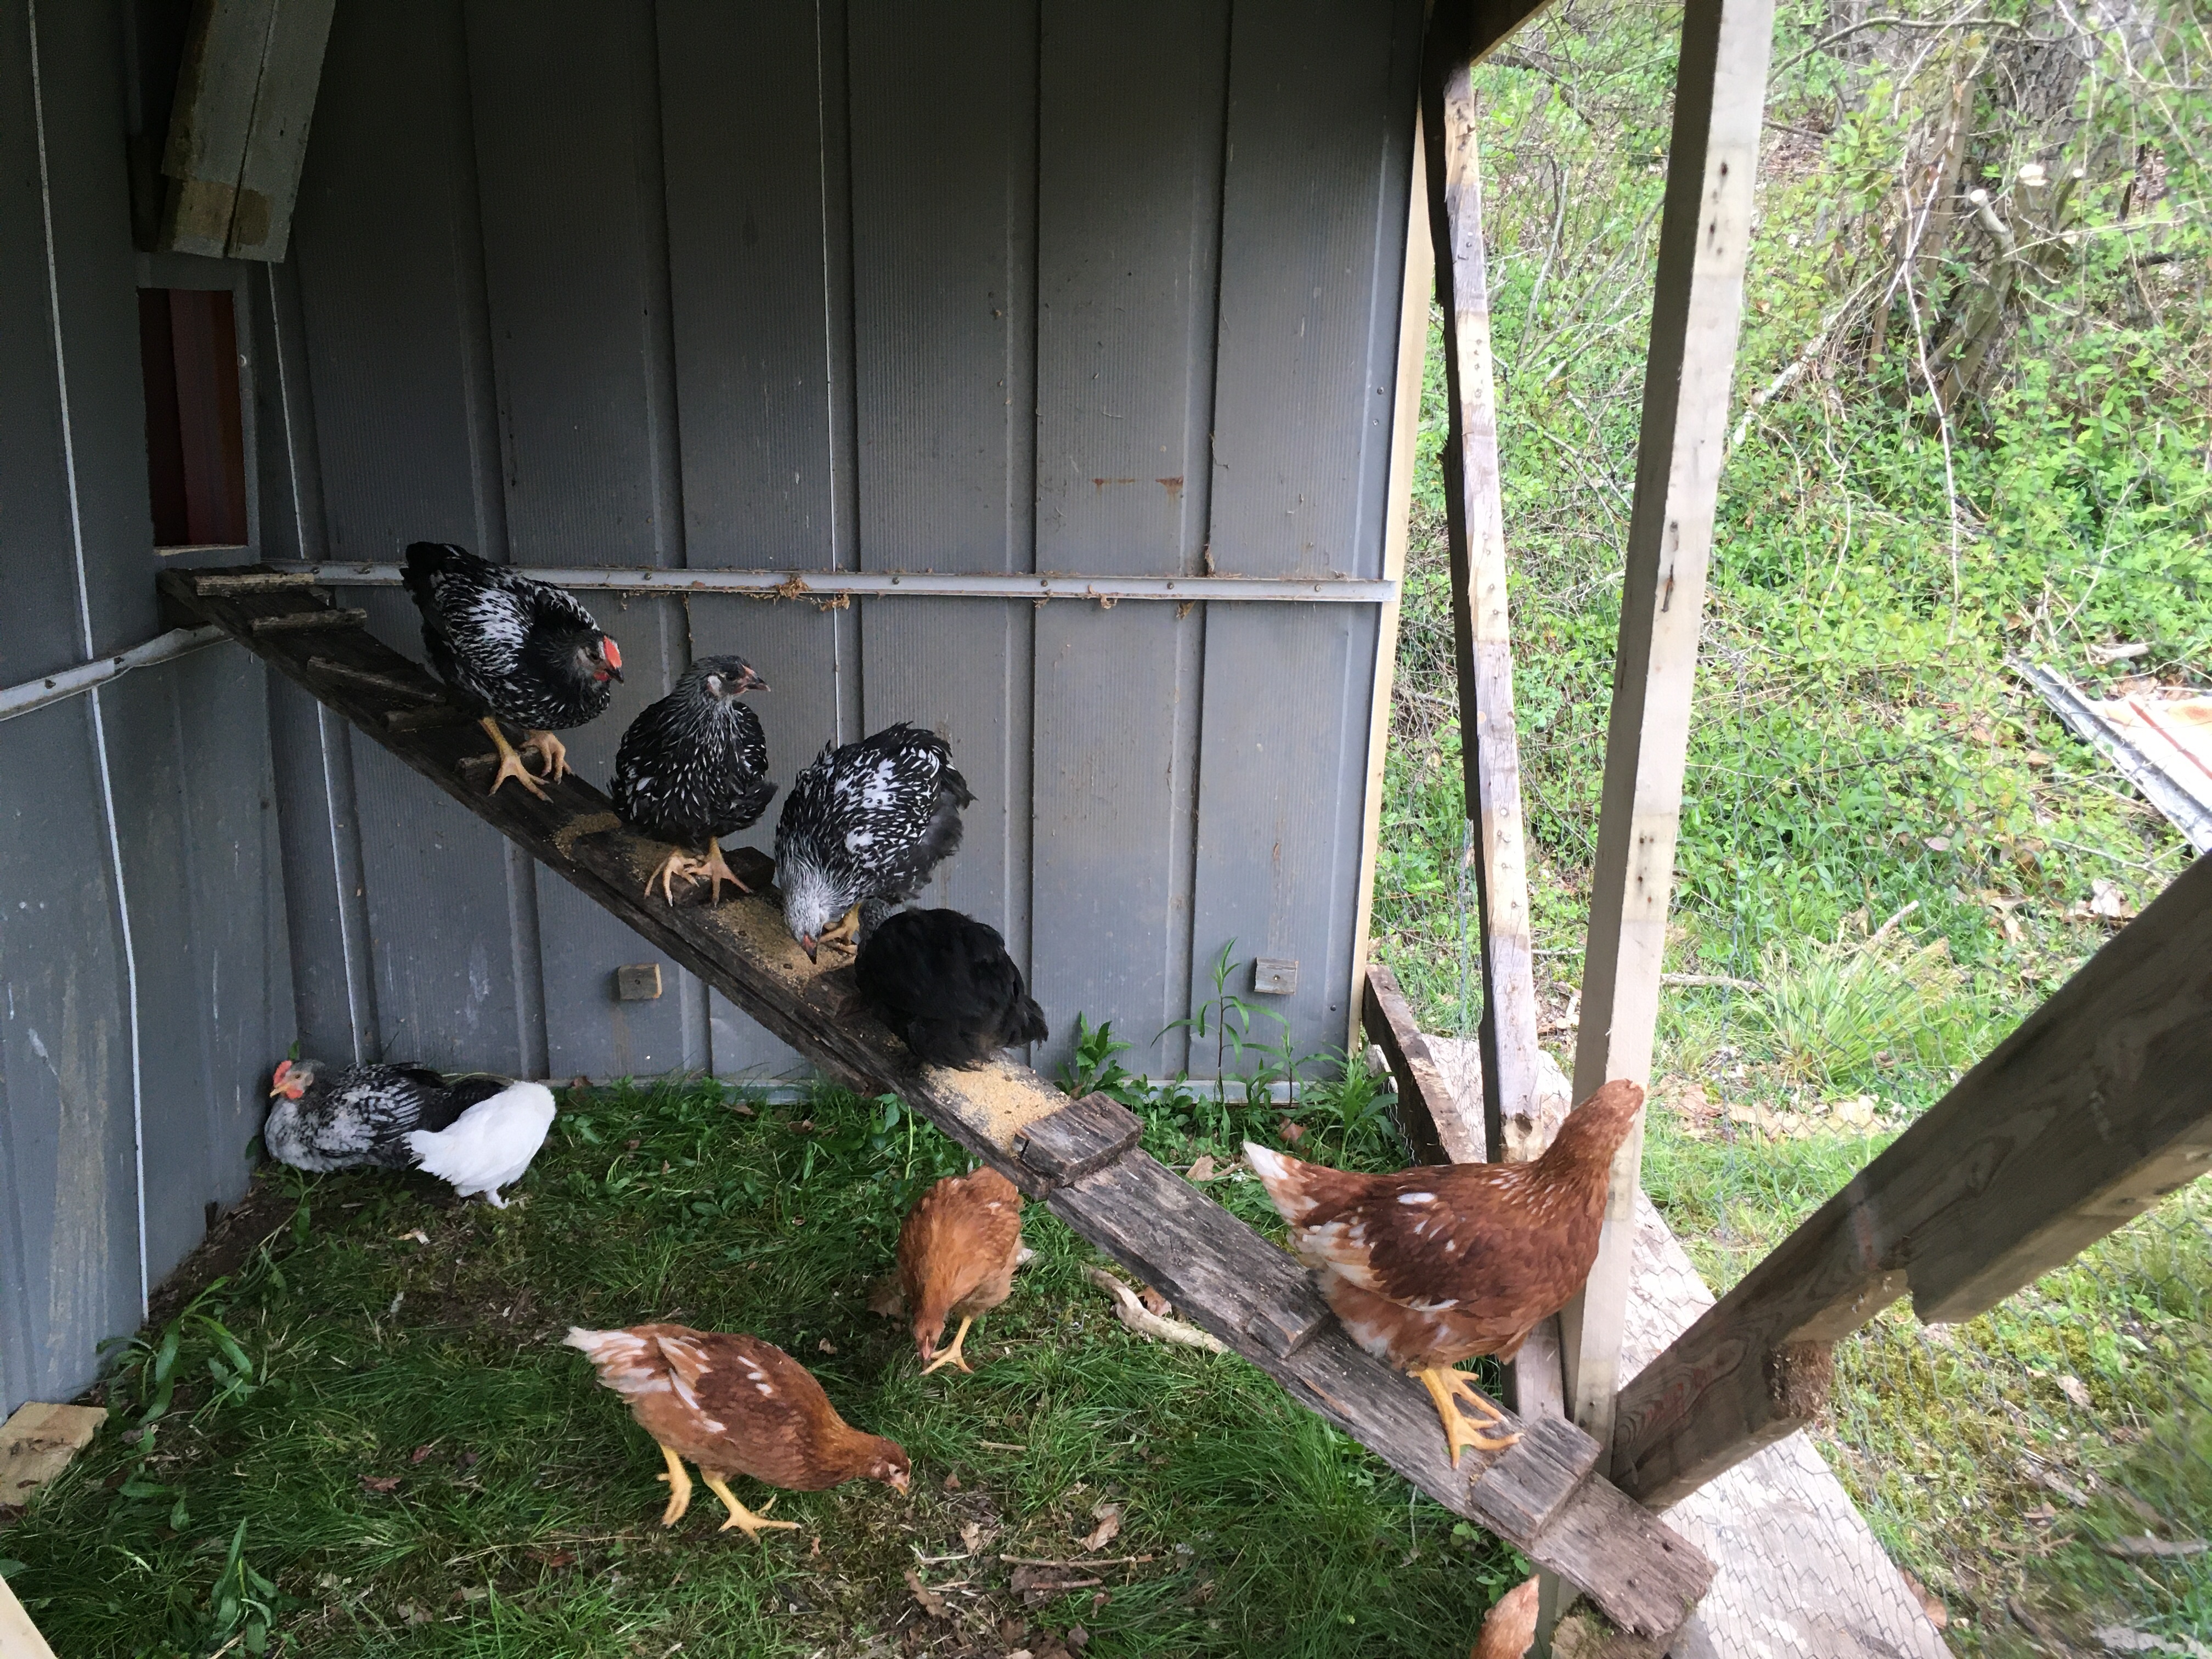
I added a few roosting perches and ramps for the chickens to go from one side of the coop to the other, and it was ready to go! I still needed to build nesting boxes and I wanted to make some more “chicken furniture,” and I also was waiting for some hardware cloth to arrive to secure the outside against predators better, but the coop was livable and that’s what mattered right now. Our 6-week-old chicks desperately needed a bigger home. Evan helped me move them, and they seem to be settling in nicely. There’s still work to be done, but for now, I’ll count my Covid coop as a success for this inept builder.